LinkedIn InMail messages provide a wealth of opportunities for sales, recruiting, networking, and marketing efforts. If (and this is a big if) the message is targeted and impossible to ignore.
Otherwise, you might just get lost in the noise. Or worse, you might annoy or frustrate your recipient with the vague, impersonal nature of your InMail message.
Want to learn how to take full advantage of LinkedIn InMail for outreach? Read on for InMail best practices and a step-by-step guide.
What is LinkedIn InMail?
LinkedIn InMail messages allow you to contact people you’re not already connected to on the platform, which makes cold outreach much more manageable.
Because everything happens on LinkedIn, you’re also reaching people at a place they come to for networking.
Unlike traditional cold email outreach, your message isn’t lodged between auto-pay reminders and subject lines that say, “URGENT! URGENT! RE: Final Files Delivery.” Being in the right place is one of InMail’s many strengths.
InMail messages appear in the “Messaging” tab of LinkedIn with an “InMail” tag. Beyond that, it looks like any other LinkedIn message you might receive.
And not to get too confusing, but there are also LinkedIn Message Ads (formerly known as Sponsored InMail), which are an entirely different channel.
These will show up with a “Sponsored” label and are set up more like LinkedIn ads than a 1-to-1 message. If you open your inbox and give it a scroll, you’ll likely see both types of messages.
How InMail credits work
Each premium LinkedIn account comes with a certain number of monthly InMail credits depending on your plan type. Currently, you cannot send InMail with a free LinkedIn account; you must have a premium account.
Here’s how many monthly credits you get for each account type:
- Premium Career: 5 credits
- Premium Business: 15 credits
- Sales Navigator Core: 50 credits
- Recruiter Lite: 30 credits
It’s important to note that credits disappear when you downgrade your account or upgrade to a different plan. Make sure to use them up before making any account changes.
How many InMail messages you can send and what counts as a credit can be a bit complicated, but here’s a quick overview:
If someone accepts, declines, or responds directly to your InMail message, you are credited back. LinkedIn is essentially rewarding you for a successful interaction on their app.
Even when your recipient auto-replies with "Interested,” "Maybe later,” or "Not interested," you’ll get your credit back.
You can’t message someone again before they respond to your first message without spending another InMail credit.
However, LinkedIn automatically sends them a reminder a few days later to check the message, so it’s worth waiting a few days.
The downside is that you won’t have as much control over how soon you can message your audience without spending another credit.
That’s the gist of the InMail credit situation, but you can check out this article for more details or contact LinkedIn support directly if you have specific questions.
Use cases for LinkedIn InMail
LinkedIn InMail is great for reaching out to people you don’t know (yet). InMail can be used for:
- Sales outreach – Find your target audience and offer a demo or free consultation.
- Marketing – Promote your business, connect with potential collaborators, and get your marketing messages in front of the right people.
- Recruiting – For HR and recruiting teams, InMail can be a powerful tool for finding talent.
- Networking – Form connections with other professionals and build your network for future opportunities.
In other words, if cold outreach or networking is a big part of what you do, InMail can help.
Here’s one example of a LinkedIn InMail use case:
Let’s say you’re looking for e-commerce startup founders to interview on the podcast you’re developing. You can find these people on LinkedIn, but they might ignore your connection request or skip the message.
LinkedIn InMail lets you pitch your request right away, break through the new request inbox, and get your message to the right person.
How to write a great LinkedIn InMail message
Writing an InMail message is similar to other outreach channels, with some caveats. Read on for a step-by-step process for drafting your message.
1. Introduce yourself
Context is necessary for cold outreach. Identifying who you are and what company you’re with will check the initial “what is this about?” box in your recipient’s mind.
Keep it short, so one or two sentences at most. If you have an elevator pitch, this is the perfect place for the shortest version of that.
2. Make it about them
According to Salesforce, 66% of customers expect companies to understand their needs and expectations. Personalizing your InMail message and researching who you’re reaching out to can help you deliver on this expectation.
After your intro, make sure you immediately prove to your recipient why they should keep reading. Think about what the biggest benefit is for them, and lead with that.
Even better, start with a pain point or challenge that relates to what you’re offering.
This part of your message should let your audience know you (1) know who they are and what they do, (2) understand their key challenges, and (3) have a solution or pitch that can help.
The hardest part of this step is to actually personalize your message and not just generalize. When your statement is too vague, it’s obvious that you sent the same thing to a million people.
Take the time to show your recipient that you’re speaking to them and only them. Check out their website and get up to speed on their products. Do what you can to make this as personalized as possible.
The more you can demonstrate (truthfully) what’s in it for them, the better shot you’ll have at getting their attention.
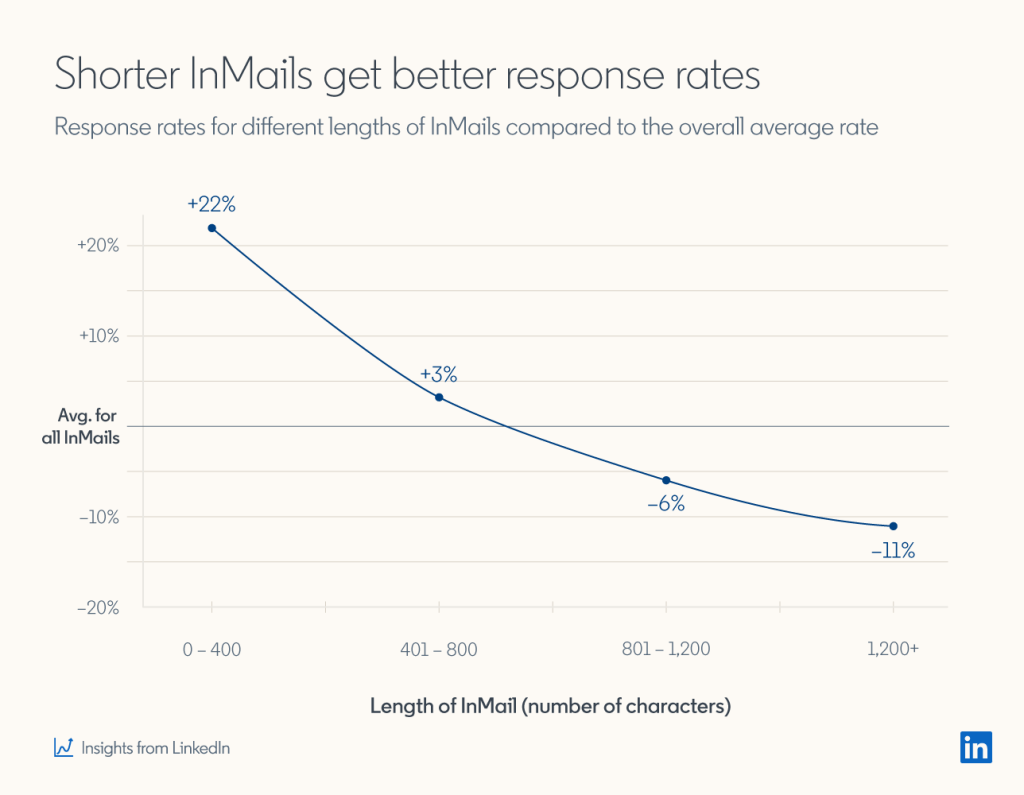
3. Keep it short
Here’s where it gets challenging: the people you’re trying to reach are likely short on time and skeptical of outreach, thanks to bad, spammy messages that clutter their inboxes.
You’ll need to show that you value their time by making your InMail message as short as possible. Nothing sends people running for the delete button faster than a wall of text.
You can write up to 200 characters in the subject line and up to 2,000 characters in the body with InMail, but that doesn’t mean you should. Even LinkedIn recommends shorter messages for better response rates.
Bruce Johnston, a LinkedIn consultant and sales coach, recommends using a maximum of 100 words in your LinkedIn message.
He says, "You want a message long enough to accomplish your goal: to get a positive response. Anything longer than that starts to introduce opportunities for your prospect to find reasons to disagree with you or ignore you.”
Aim for 3-5 sentences to communicate who you are and what you’re offering.
You can always get into specifics in follow-up messages or once they’ve raised their hand and said, “I’m in.”
Don’t feel like you have to tell the whole story in this one initial opportunity. You might inadvertently push them away from engaging with you.
4. Include a call-to-action
The last part of your message should always outline the one action you want them to take after reading it.
Most of the time, you’re likely asking for a simple reply. You might also request that they book a call or schedule a demo with you.
Whatever that next step is, make it clear in your InMail message, and make it as easy as possible for them to do.
The more barriers between them and the action to take, the more chances there are to give up. A direct link with as few steps as possible can encourage people to follow through.
5. Watch your timing
The more messages you send, the more data you’ll have on what works best for your audience. That includes the best days and times to reach out.
Until you get to that point, send your InMail messages when people are most likely to be online and active.
For LinkedIn, that probably means during work hours, Monday through Thursday. It’s not a guarantee, but since most LinkedIn activity is work-related, it’s a fair assumption that people are on the platform during the workweek.
LinkedIn identified Fridays and Saturdays as the days with the lowest engagement, so definitely keep those off of your calendar. If possible, avoid weekends or late nights in your recipients’ time zones.
With these tips in mind, you’re ready to start reaching out to prospects.
Best practices for LinkedIn InMail outreach
Outside of the message itself, you can take steps to help with the success of your LinkedIn InMails. Here are a few ways to give your InMail messages their best shot at success.
Optimize your LinkedIn profile
A fully filled out and active LinkedIn profile can offer more proof that you’re a trustworthy person.
At the minimum, your profile should have the following:
- A simple, engaging headline that mentions your title
- A professional-looking photo or headshot
- A quality background image at the top of your profile
- A summary that highlights your background and experience
- Your current position and company
- Bonus: Recommendations, education, and recent posts
Your profile should back up what you said in your elevator pitch, so make sure your profile reflects what you write in your messages.
If you’re actively posting or commenting on others’ posts, this also signals to your recipient that you’re a real person engaged in the LinkedIn community.
Remember to follow up
Most initial cold outreach efforts (whether through LinkedIn, email, or phone) don’t result in a reply on the first try. That’s why follow-up is just as important as the initial message.
Don’t forget — with InMail, LinkedIn will follow up on your behalf three days after your initial message, so there’s a good reason to wait at least 3-4 days before sending another message.
If they haven’t responded to your message, you’ll spend another InMail credit on your follow-up.
You can (and probably should) follow up with a prospect 2 or 3 times. Just make sure to space out your messages and vary them so you’re not just resending the same thing over and over. That’s another recipe for deleting messages.
A good sequence might look like this:
- Day 1: Initial message with your pitch.
- Day 5: Follow-up #1 with a stat or result they could expect to see.
- Day 11: Follow-up #2 with a simpler CTA asking them simply to let you know if they’re interested.
- Day 25: Follow-up #3, just make sure your message “didn’t get buried.”
Try other channels
There comes a time when you might want to bring your outreach off of LinkedIn.
If you don’t receive a reply after your fourth message on Linkedin, it’s definitely time to try reaching the prospect through other channels. In most cases, the next channel to look into would be email.
You might even switch from LinkedIn to email after your first message to save your credits and keep your momentum.
If you don’t know your prospect’s email address, you can find it easily using Hunter’s Email Finder. Simply enter the person’s name and website, and you’ll get their email address in seconds.
Once you have the prospect’s email address, you’re ready to draft the email.
If you think getting a reply from the prospect will require multiple email follow-ups (or you need to follow up with multiple prospects), you can set up an automated email sequence using Hunter Sequences to save time.
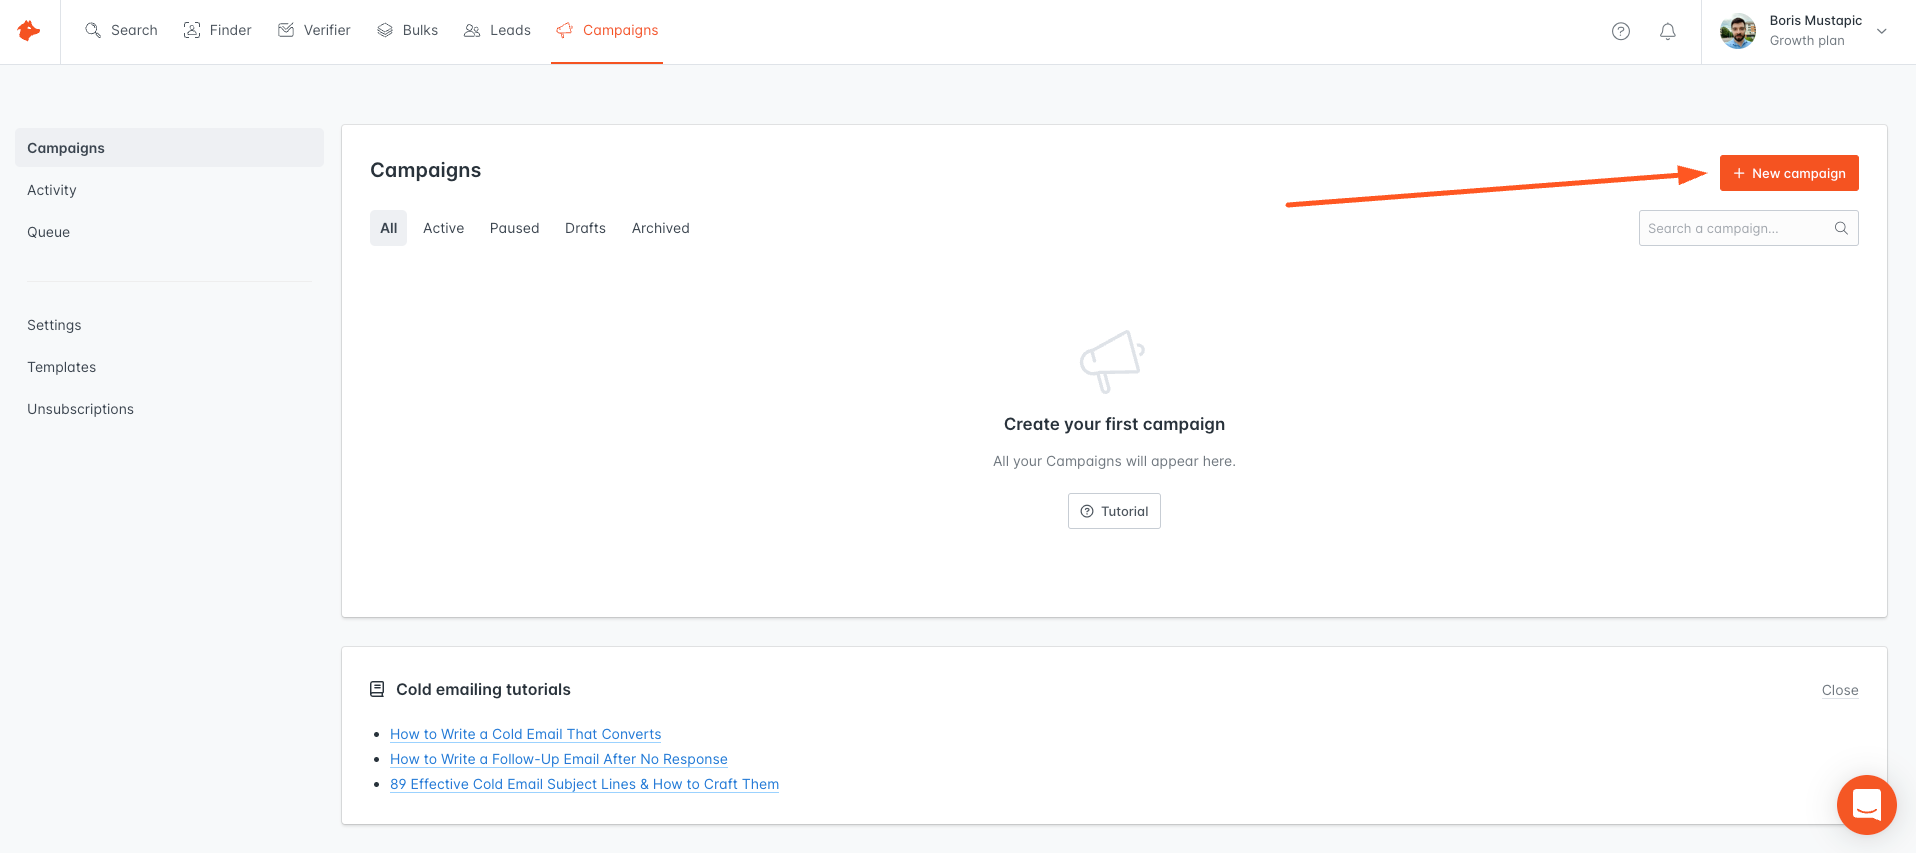
Here’s how to do it:
Start by creating a Hunter account (if you don’t have one already). Once you’re logged in, go to the Sequences tab and click on +New campaign.
Connect your email account.
Now you can go ahead and add the first email in your sequence. Because you’re switching from LinkedIn to email, make sure to mention your previous message and the pitch (“You may have seen my LinkedIn message…”)
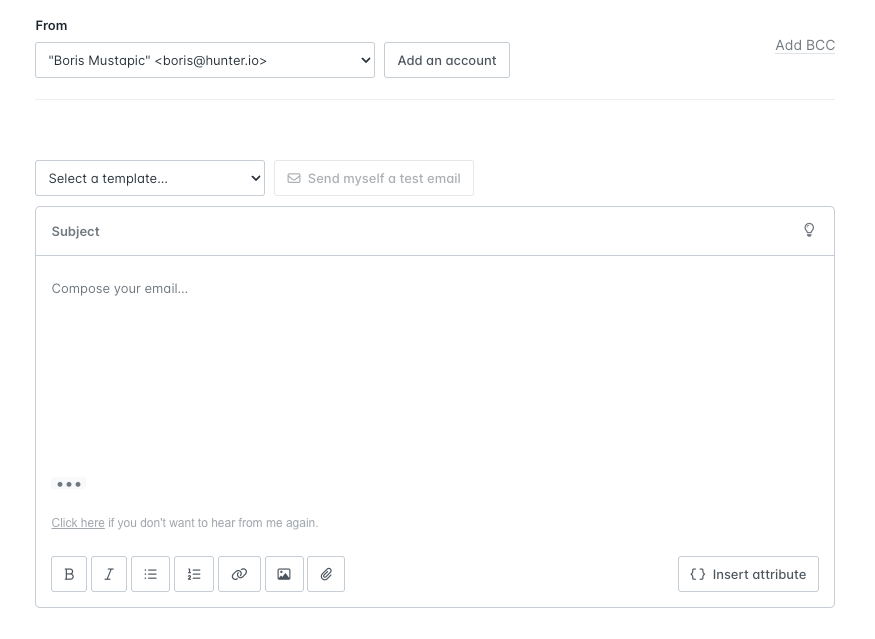
Additionally, try to add value to your email. Avoid making it seem like you’re following up just to get a response.
Make this message its own by adding a link to a helpful resource or supplying more information that could compel someone to respond.
Finally, tie it all together with a simple call-to-action.
If you’d like to add one or more follow-ups to your email sequence, click the Add a follow-up button and fill out the copy for your follow-up email.
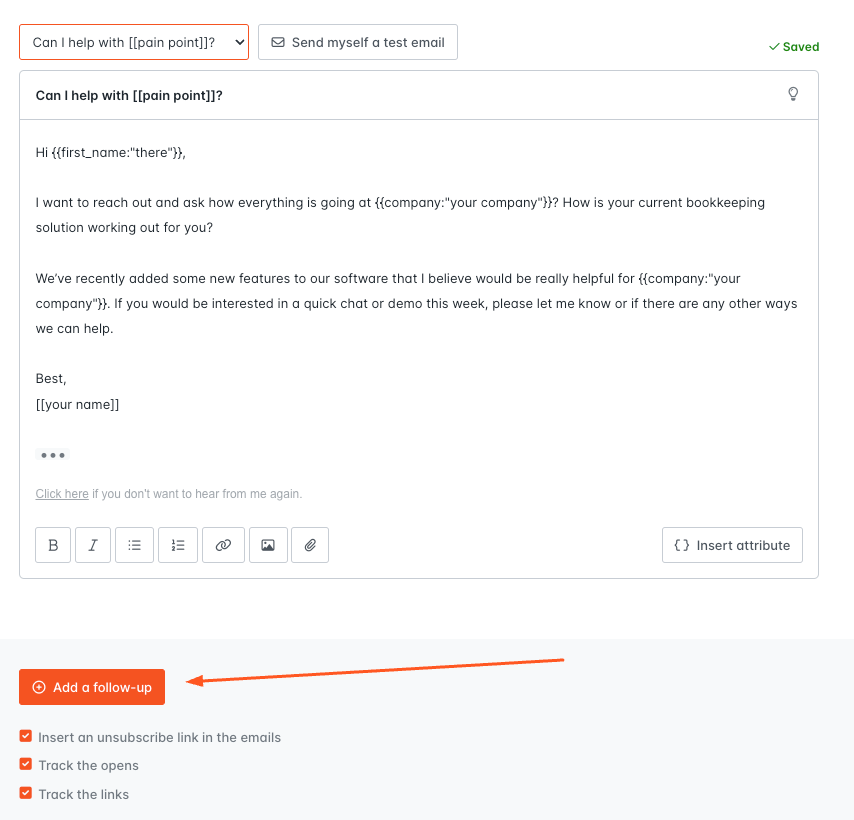
Once you’re finished, click the Next button.
On the next screen, click the Add recipients to the campaign button. Paste your prospect’s email address.
Click on Next.
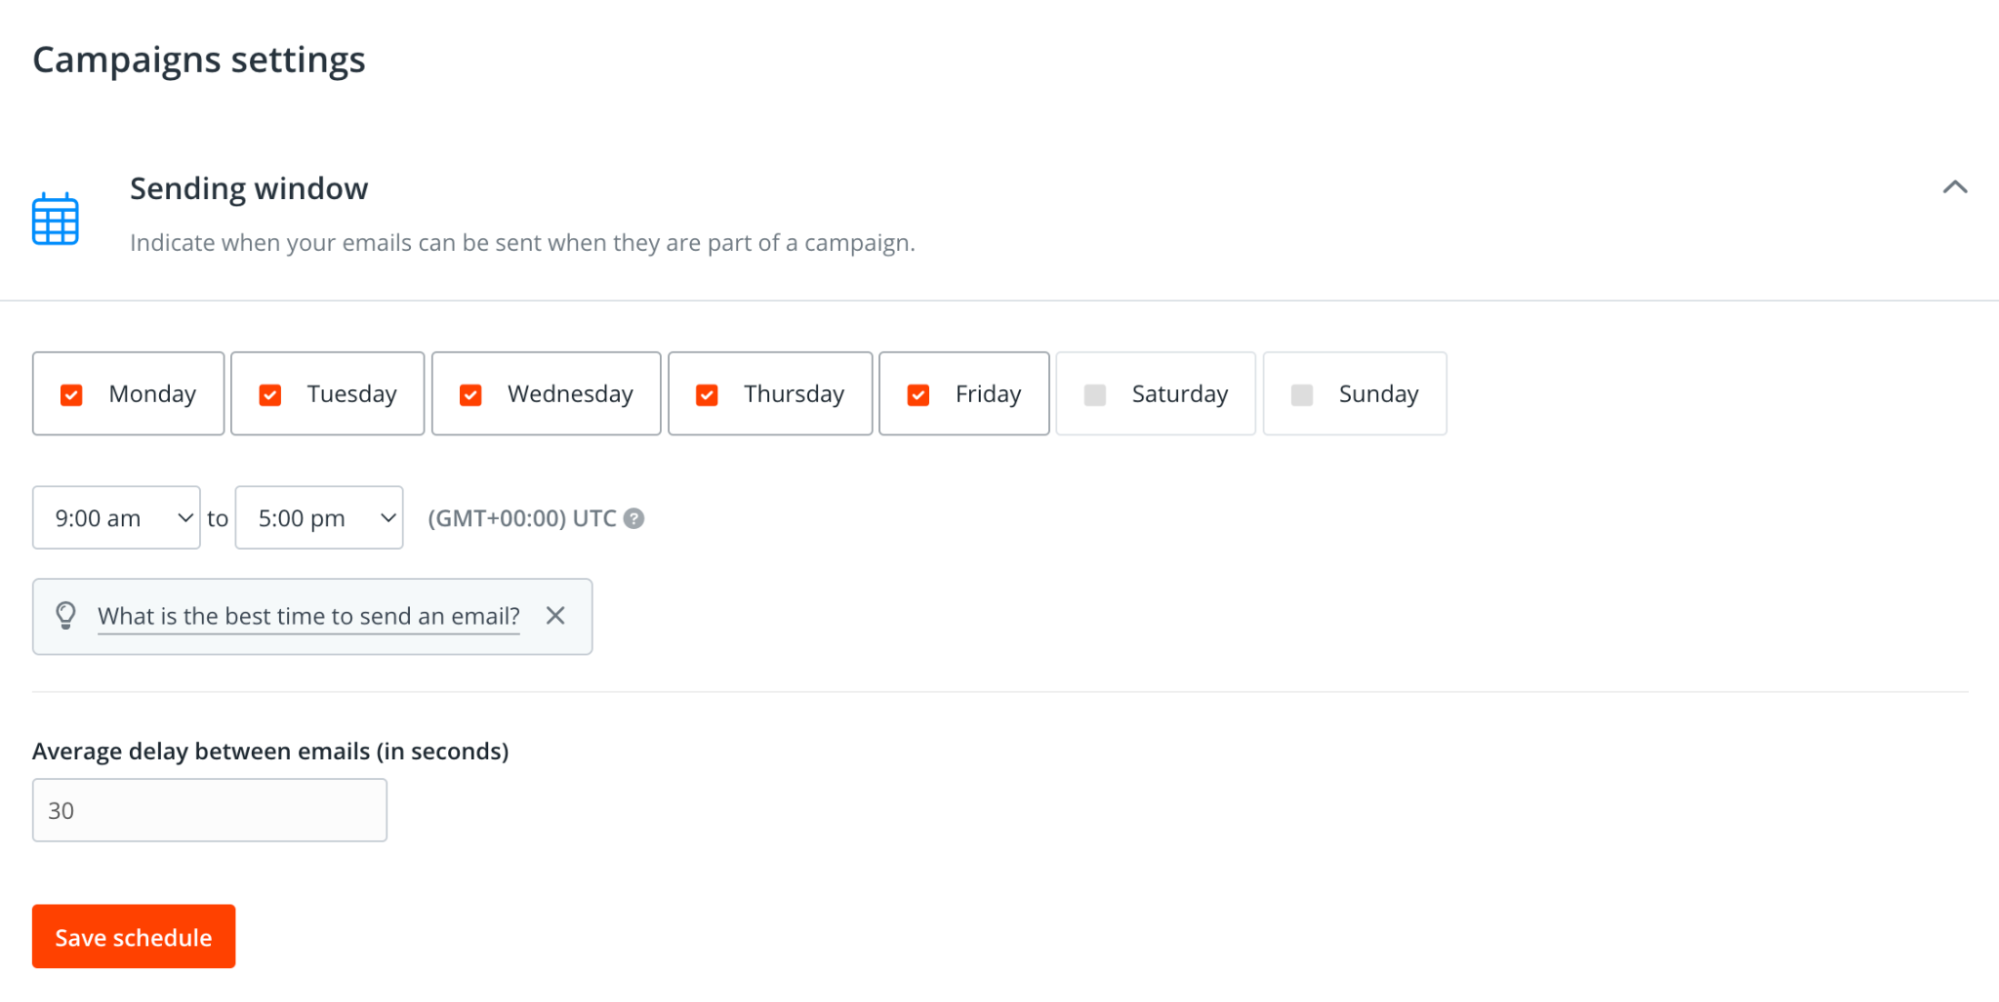
Here, you’ll be able to choose a sending window for your campaign and set a custom unsubscribe message.
Click the Next button again and review your campaign one last time. If everything looks good, click the Launch button. That’s it!
Varying the channels and messages you’re using will ultimately help your message reach the right people successfully. Maybe this person isn’t on LinkedIn often, or their inbox is so overloaded that they just ignore it.
Your audience might see your name or company in your email and recognize it from LinkedIn, so it’s worth the time to try different tactics.
Another strategy would be to send an InMail message, then a connection request. If they accept your request, you’ll be able to message them directly and can move into your follow-up messages that way.
Reach your goals with LinkedIn InMail
And that’s how you can start using InMail for outreach. Try the steps above and let us know how it goes. No matter what happens, you’ll be collecting valuable data on what gets results and what gets ignored for future campaigns.
Want to learn more about LinkedIn outreach, prospecting, and business development? Check out these guides:
- LinkedIn Prospecting: Techniques, Tips, and Tools
- Social Selling: Everything You Need to Know
- How to Get More Clients for Your Business (9 Strategies)


 Send cold emails with Hunter